A Yaesu FT-530 (in mint condition) had a strange behaviour! It discharge a fresh charged battery in about a week on standby! Well, I do have a similar radio in my collection (Yeah baby, with the remote mic/speaker, the one with LCD) and I can tell you that you can keep the radio for more than 3 months on a charged battery and it's not dischargin it to the bottom.
It's true that the radio has a software On/Off switch but the discharge current is around 74 uA, so there is no chance to see a discharge in one week.
First tought was that the battery was weak or, because the owner used a LiPo two cell series custom pack, the inner equaliser circuit is the culprit. But was no case, the circuit was OK!
A quick measurement on the current, at the battery connector, came up with a 10 mA surge with the radio off! too much for this radio!
So, the hard part was to came!
When repair a FT-530, be prepared with the schematics. Sorry, no electronic service manual is available on the internet, that radio was made well before the internet age and it's built like a tank so not too many users need that service manual...
After that, I suspected something wrong at the VHF/UHF hybrid PA. But this was a theoretical approach and I had to open up the radio.
So, I took off the screws and open up the radio. Again, I was amazed about how well is designed this radio! Looks like the engineers won the battle with the management team and imposed the best that they could did with no cost control imposed!
Two microprocessors, helix filters in Rx front end, backup battery for the watch, separate boards for VHF section and UHF section, bottom line, the Yaesu FT-530 IS THE BEST HAM RADIO I SAW EVER. EVER!
First of all, the radio 'breaks' in two major halves. The upper one, with the LCD and keyboard has the audio and logic boars. It's on the right side. There was no interest in that yet because the first step was to put the radio in working mode without the case to be able to check some voltages and currents.
At the very botton, right under the battery holder, there is a board where you can play with various levels at receiving signals and modulation. And after you play, you came here to put the radio on the analyser because is screwed, HI.
The left side of the radio (the rear half) has the radio boards. The VHF is on the upper plate, the UHF on the bottom. On the UHF radio board is the antenna connector and also the external power connector.
You can see the silicone thermal grease. Well, that was put by me; I somehow cheated with these pictures as I took them AFTER the repairment :-)
After I dismount the whole rear boards, I reassembled them on the bench. You know, the radio boards are controlled each by a small control module which communicate with the uC on the front board. Therefore, you cannot measure anything without a proper jig or with the radio assembled!
I fed the radio with + 10V and limited current (around 100 mA) directly on the UHF board, right at the external power connector. And I measured the current. Still 10 mA! No good.
So I fed the radio at the common point between D2030 and D2029. This diodes separate the battery circuit and the battery charger circuit (Q2017 and associate passive components).
Big surprise! The power sure came at the right current: 74 uA!
So, the only suspect here was the charging circuit itself! I wanted to know what was the voltage drop between the +Batt and CHG pins at J2005 (UHF board connector) but I found 0 volts there. And THIS WAS UNUSUAL!
Measuring the resistance, I came up with 0 Ohm. This meant that both D2029 and 2030 diodes and also the Q2017 (BE junction) where conductive! Off the circuit, these components was performing as needed. So, there was a fault in the circuit's lines!
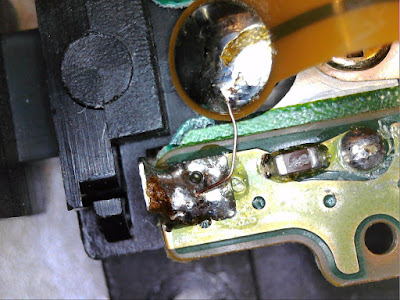
For no reason at all, I start to look very carefull at the battery contacts. There is a plastic board (at the bottom of the radio) where the contacts to the battery are. Between the + and - there is a small contact pin with a spring which is used to charge the 9.6 and 7.2 battery packs to charge them when attached to the radio (sorry, no 12V charging there, only on the desktop charger)!
A quick look revealed nothing but a carefull one with my magnifing lenses showed a little reflection on a metal wire which has no reason to be there!
Well, my intuition was right; this was the problem! Someone (I believe the one who took 'care' about the original silicone thermal grease)
 |
| Can you spot the problem here? |
 |
| Sure you can see it now! |
Case closed...
73 de YO3HJV
 |
| One is mine, one is the repaired one... |


2 comentarii:
Detin un manual de service pentru FT 530.Daca sunt probleme va pot ajuta. Manualul e destul de amplu. Numai bine dela YO8CDD. adresa de mail este indicativul pe yahoo.com.
good day. I have a 530 ft that being on, in a sealed box outside as a cross-band repeater, from one moment to the next I do not retransmit more, and I saw that it only showed the frequency of vhf. I turn off and on, and start well. but no roof of the front keyboard works for me. those on the side, power, sql, ptt and light are doing well.
I'm afraid to seal the mic, since the keyboard enters directly to it.
Any idea what might be happening or how to fix it?
LW7EEA
Trimiteți un comentariu